Viola & Jones Object Detection Algorithm
Viola Jones Face
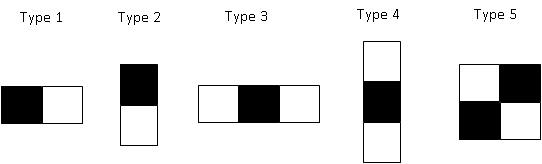
Detection Algorithm [1] uses Haar features as shown in Figure 1. The steps in the algorithm
are
- Integral
Image Calculation
- Feature
Computation
- Adaboost
Feature Selection
- Classifier Cascade
All the haar features
(shown in Figure 1) in different scales are used to produce approximately 1,80,000
features. Viola Jones uses 24x24 window as the base window size to evaluate the
haar features.
Figure 1. Haar Features Used in Viola Jones [1]
1. Integral image Calculation
Consider an image
with pixel intensities as shown in Figure 1.1
5
|
2
|
5
|
2
|
3
|
6
|
3
|
6
|
5
|
2
|
5
|
2
|
3
|
6
|
3
|
6
|
Integral Image of the above image is calculated as follows
For each pixel, we
draw a line as follows. All the pixel intensities above the line must be added
to get the integral image.
The
value of first pixel remains the same.
The
value of first row second column value changes from 2 to 7
So, in place of 6 we get 6+5+2+3 = 16
We calculate like this for all the
pixels in the image and the resultant image is called integral image.
2. Feature Computation
A haar classifier as
shown in Figure 1.2 is run on the image and we
sum all the pixels under black region and subtract from sum of all pixels under
white region. If the difference is above some threshold, the feature matches.
This computation will be easy, if we calculate the integral image.
5
|
7
|
12
|
14
|
8
|
16
|
24
|
62
|
13
|
23
|
36
|
46
|
16
|
32
|
48
|
64
|
Figure 1.3 Haar Classifer When Run On Integral
Image
Sum of pixels under black region = 5+32-(7+16)=14 (same as 6+2+6 =14 in given
image). Sum of pixels under white region
= 7+48-(12+32)=11 (same as 3+5+3 in
given image)
3. AdaBoost
Adaboost is used to
train Strong Classifier which is linear combination of weak classifier. It also
decides whether a feature is relevant or not. The steps in Adaboost are:
- Training set of positive
and negative examples (Ex: faces and non-faces images).
- Initially
all the positive training images are given weights equal to
and negative training images are given
weights equal to
.
- All the 1,80,000 Haar
features or weak classifiers are
run on the training images
- A good threshold (for ex: decision tree) such that any image above threshold is face and below threshold is
non-face is determined.
- Now,
Error rate is calculated as sum of weights of images misclassified by each
weak classifier. Of the 1,80,000 error rates choose the weak classifier
with lowest error rate.
The chosen weak classifier is added
to the strong classifier. Now, increase the weights of misclassified images and
decrease the weights of correctly classified by normalizing the weights. Again
repeat the steps 3 to 5 for 1,80,000 times and all the Haar features
are run on the images with updated weights and each round selects one weak
classifier, which is added as linear combination to obtain final Strong
Classifier. The output of weak classifier is 1 or 0 for classifying the image
as face or non face.
4. Cascading Of Stages
After all the rounds
of Adaboost, we build a strong classifier which is a linear combination of
selected weak classifiers (let’s say, 2,000). Instead of running all the 2,000
weak classifiers on the 24x24 window of test image, we build a cascade of
classifiers. This will reduce computation cost as Stage1 immediately rejects
windows that are non-faces.
Figure 1.4. Cascade of Stages to Reject Non-Face
Windows Immediately [1]
To train a cascade, we must choose
- Number of stages or Strong classifiers in
cascade
- Number of weak classifiers in strong
Classifier (which is done by Adaboost)
For this we do Manual Tweaking, which is a heuristic algorithm to
train the cascade
- Select Maximum
Acceptable False Positive rate.
- Select Minimum
Acceptable True Positive rate.
- Threshold for each
Strong Classifier (which is decided by Adaboost)
Let the User select the Target Overall False Positive for all the
stages
Until Target Overall False Positive is met
Add new Stage
Until Maximum
Acceptable False Positive rate and Minimum Acceptable
True Positive rate are met
Keep adding weak classifiers and train
Strong Classifier using Adaboost.
You can listen to the video at below link
https://www.youtube.com/watch?v=WfdYYNamHZ8
References
[1] Viola, Paul, and Michael Jones. "Rapid object detection using a boosted cascade of simple features." Computer Vision and Pattern Recognition, 2001. CVPR 2001. Proceedings of the 2001 IEEE Computer Society Conference on. Vol. 1. IEEE, 2001.